How To Setup Ruby Debugger In VSCode
Table of contents
- Table of contents
- Assumptions
- What you need in your environment?
- Scope of the tutorial
- .vscode setup
- Running the debugger
Assumptions
- You are utilizing VSCode to write code.
- You are learning the Ruby programming language and want to learn how to setup the VSCode debugger tool.
- You are an experienced Ruby developer but new to VSCode and want to setup your debugging environment.
What you need in your environment?
- VSCode
- gem install ruby-debug-ide
- gem install debase -v 0.2.2.beta10 or higher versions
Scope of the tutorial
For either beginner or experienced developer, having a good debugging setup is a must have. In this short tutorial I’m going to show you how to setup the VSCode debugger for Ruby development.
.vscode setup
In the root of your project create a folder .vscode and inside create a file launch.json. Paste the following object…
{
    "version": "0.2.0",
    "configurations": [
        {
            "name": "Debug Attach",
            "type": "Ruby",
            "request": "attach",
            "cwd": "${workspaceRoot}",
            "remoteWorkspaceRoot": "${workspaceRoot}",
            "remoteHost": "127.0.0.1",
            "remotePort": "1234"
        }
    ]
}
Now you can save and close the file.
Running the debugger
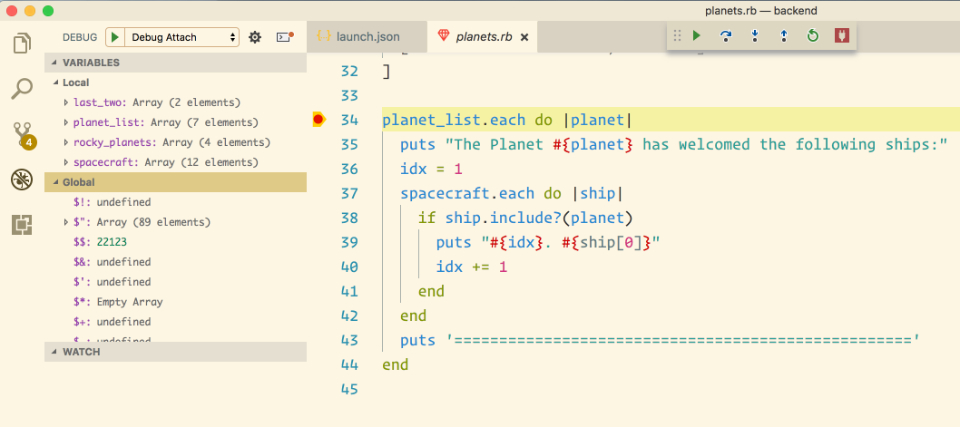
To create a breakpoint, open the file you want to debug. Click in the gutter next to the line number of the line of code you want to debug.
To actually run the debugger, open the terminal and cd to the root of your project. Once there, run the following command. Please notice that you need to include the path to the file you want to run.
rdebug-ide --host 127.0.0.1 --port 1234 ./path_to_file/file.rb
Your terminal prompt will be wating for you to start debuggin. Next, click the debug icon which is the 4th icon from top at the very left side of VSCode. Choose Debug Attach from the pulldown at the top of the sidebar. Now click the play button. Your sidebar will display the call-stack and a small debugger navigation.
Hope this helps!!!